MFT Command Central Documentation
MFT Command Central is a tool (or wrapper) to allow to you to perform functions in MoveIT you otherwise wouldn’t be able to perform in MoveIT itself. Primarily this is making Groups and changing the Group’s description for example. The layers of user access in MoveIT by itself is very limiting and not particularly agile. It either provides complete access or very limited with very little in between. This tool helps make up for this limitation by providing a better middle ground such as providing more features a user wouldn’t ordinarily have in MoveIT while keeping data separate from different departments within RICOH to fit particular policies. This tool is still in development and therefore this documentation may not always contain the most up to date information.
You can find MFT Command Central here: https://file.ricohlegal.com/Manage
NOTE: This documentation is only for MFT Command Central and not for MoveIT itself. If you wish to see the documentation for MoveIT then login to https://file.ricohlegal.com and click on “Online Manual” in the bottom left section of the site.
Login Screen
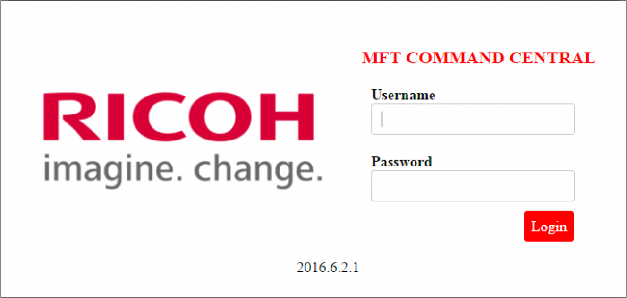
The Login screen in MFT Command Central is how you would enter the tool. The credentials are exactly the same as if you were to login to MoveIT. Your MoveIT account must fit at least one of these rules in order to be able to log into the tool.
You need to be a group administrator of a one or more groups in MoveIT
You are in a designated ‘Association’ master group
You’ve been identified as RICOH Legal Project Manager
Your account is at ‘Admin’ User Level in MoveIT
If you don’t meet any of these rules, you will not be able to login into this tool. This tool is primarily for department administrators to be able to better manage their client groups, create new client groups, make new client accounts and add existing MoveIT users to groups.
1.1 Interface
Username – You would enter your MoveIT username here
Password – You would enter your MoveIT password here
WARNING: Due to bug on how session management presently works in MoveIT – logging directly into MoveIT (https://file.ricohlegal.com) while having already logged into MFT Command Central (https://file.ricohlegal.com/Manage) will cause your MFT Command Central session to break and effectively boot you of the tool. Logging in again into the tool will fix this and we’re currently looking into a workaround for this behavior. Logging into MoveIT first and then MoveIT Command Central afterwards would also avoid this issue.
2 Group Management
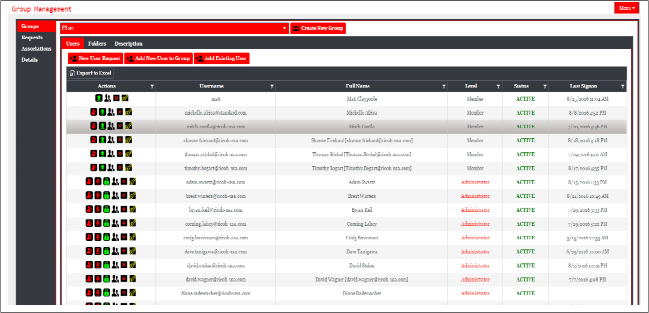
The Group Management page is where you can use all the features that MFT Command Central has to offer. The look of the interface above is how it would look if you have had all capabilities. The look and options of this interface could change considerably depending on what type of user you are and which groups you are managing. We’ll go into the details of this interface in the next sections.
Left Menu

The Left Menu provides tabs to manage Groups, Requests, Associations and Details. Depending on type of user you are you won’t see some of these tabs.
Groups – This is where you would manage the groups you are a group administrator for. You can create new users for the group, add existing users in MoveIT to the group and perform various functions for particular users. You can also add folder access for your groups here and change the group’s description. We’ll go into more details here in later sections.
Requests (RICOH LEGAL ONLY) – This is where account creation queue is located for LDS FTP Administrators to approve accounts from Project Manager requests. LDS FTP Administrators can also add new user requests to this queue.
Associations (YOU ARE IN A MASTER ASSOCIATION GROUP)– This is where you can find all groups which are in your ‘association’. You can add a group to your association remove a group from your association and turn off or on ‘Admin Sync’. We’ll go into more details of this interface in a later section.
Details – This is where you can view details about your association (if you’re in one) and also view the groups you are able to manage. The Groups section also provides statistics on the number of administrators and general users in the groups. Also if you are part of an association this where you’ll find the log data of the ‘Admin Sync’ functionality for the association(s) you’re part of
Top Right Menu

The Top Right Menu provides access to different pages within the tool. Most users will not see other choices here other than ‘Sign Off’.
Group Management – Brings you to the Group Management page (see 2 Group Management). This is where you can manage your groups and users if you are a group administrator.
User Requests (RICOH LEGAL ONLY) – This is where RICOH LEGAL Project Managers can request MoveIT accounts for approval from the LDS FTP Team. This page would be RICOH Legal Project Manager’s default starting page when logging into MFT Command Central. LDS FTP Administrators also have access to this page.
Sign off – Sign off MFT Command Central bringing you back to the Login Page.
3 Groups
The Groups page is a powerful page providing these features:
Creating new Users for Groups
Adding existing MoveIT users to a Group
Generating a New User Request (RICOH LEGAL ONLY)
Giving new Folder access for a Group
Disabling User Access
Promoting a user to Group Admin
Cloning a User
Removing a User from the Group
Resetting a User’s Password
Changing the Group Description
Setting a ‘Staple’ Admin

Group Controls

In the group controls you will have the combo box to select the group you would like to manage. Simply click on the combo box and find your group. The groups shown in this listing are the groups you are either a GroupAdmin for OR the groups are part of the Association you are in. Unlike MoveIT – An Association provides you with the ability to manage a group without actually being a Group Administrator or member in the group. This will NOT translate to MoveIT because an ‘Association’ is unique to MFT Command Central to help better manage your client groups. We will go into more detail in another section about ‘Associations’.
The Create New Group button will show if you have permissions to create a New Group. If you don’t see this button and wish to create a new group you must contact a MoveIT Administrator to get permission.
Group Description
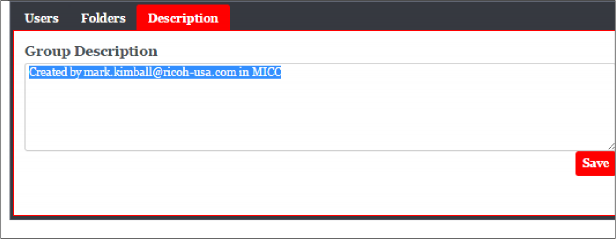
The Group Description can be changed under the Description tab for the Group. The changes you make here will not be saved until you hit the “Save” button on the lower right. You will see your group’s description change when viewing the group in MoveIT.
New Group Creation
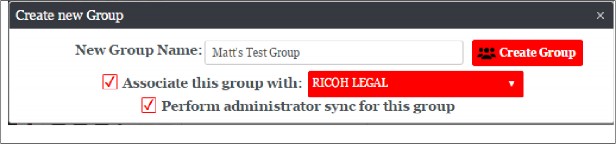
The new group dialog will let you create a new group in MoveIT. You can provide this group new folder permissions and add users to this group.
New Group Name – This will be the name of your group. The group name must be unique to MoveIT
Associate this with – You can associate this group with a ‘Association’ which helps provide a wide set of department administrators to manage this group. Not selecting this option will only have you as the sole group administrator when the group is generated.
Perform administrator sync for this group – If you have selected an Association for this group, you will also get the option to perform a ‘administrator sync’ for this group. This will add ALL members of the Association’s master group as Group Administrators in the new group you create.
Users
Group Users Grid
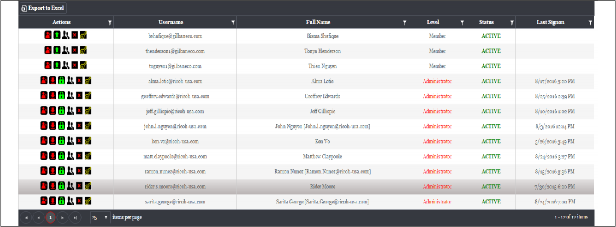
The Group User’s Grid is where can view users within a group, the fields are as follows:
Actions – This is where you can perform various functionality on a user accounts in a group. We’ll go into more detail about this in 4.2.
Username – This username for the user logging into MoveIT
Full Name – This is the Full Name of the user. The Full Name must be unique for the entire MoveIT instance
Level – This is the user’s permission level within the group. It’s either Member or Administrator. Administrators are able to do more in managing the group such as setting permissions on folders and also providing the ability to log into MFT Command Central to manage a group.
Members generally can only download or upload files and create subfolders (if permissions are set to allow this). They will not be able to manage the group in anyway.
Status – Determines if the user is able to access MoveIT . ACTIVE means this user is able to access MoveIT. SUSPENDED means the user’s account is locked and he\she cannot access MoveIT whatsoever.
Last Signon – Provides the date of when that user last signed onto MoveIT. If there is no date that means that user has never logged into MoveIT.
Group User Actions

| Disable MoveIT Access | Powerful feature to disable user’s ALL access to MoveIT, this is a system wide button. |

| Promote User to Group Admin | Gives user the ability to manage the group and to be able to manage the group through MFT Command Central |

| Clone User (Permissions and other Groups this User is In) | Generate a new user and copies the clone user’s permissions and groups he or she is part of to the new user |

| Remove User from Group | Removes the user from the current group you are managing |

| Reset User’s Password | Resets the user password, sends a email to the user with a new password |

| Set Group Administrator as ‘Staple’ Admin | Setting a Group Administrator as a ‘Staple’ Admin overrides the ‘Admin Sync’ functionality of the Association. If this administrator was not member of the master Association group then that user would be removed from the Group. This option overrides this by keeping the user as a group administrator even if not part of the master group of the Association. This is useful if you wanted a client being able to administrator in their own MoveIT group |

| Demote User to Member | Demotes the User back to Member from Group Administrator |

| Enable MoveIT Access | Enables the user to access MoveIT, this is a system wide button |

| Turn off ‘Staple’ Admin | Turns off Staple admin and Admin Sync will remove the user if the user is a Group Administrator but NOT part of the master association group. |
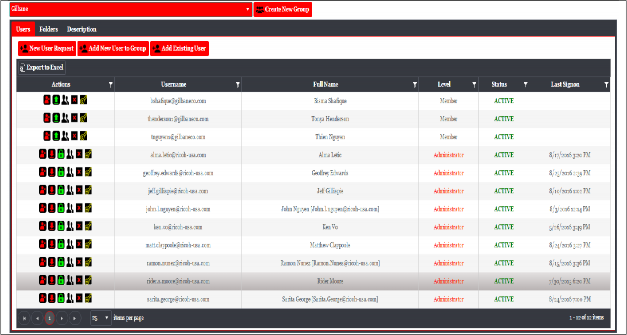
Adding Users

New User Request (RICOH LEGAL ONLY) – Create a new user request to put into the queue for approval.
“Add New User to Group” OR “New User” – Depending on your account this button may have different labels but functionality will be the same. This will create a new user for the group.
Add Existing User – This will allow to add an existing MoveIT user to the group
New User or “Add New User to Group”
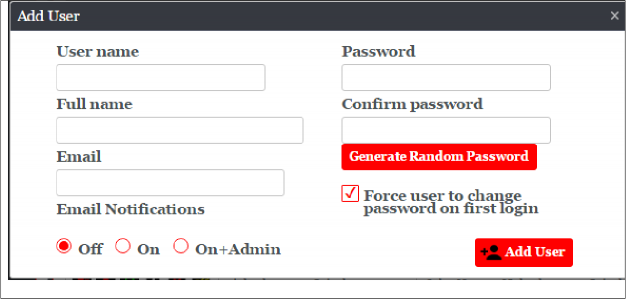
The “Add User” Dialog will allow you to generate a new user account. This new user will then be added to the group you have open. The new user you make will be added to MoveIT and is available to be added to other groups using the “Add Existing User” button.
Email – Email Address of the user
Password – password for the user
Confirm Password – Type same password you entered into the password field.
Force user to change password on first login – After the user is created on the first login to MoveIT they will be asked to changed their password. You should leave this on.
<Generate Random Password> - this will generate a random password and will automatically fill the Password and Confirm Password fields. Take note of the password to provide to the user.
Email Notifications – this will determine how the user will receive file alerts
Off – The user will not receive any alerts
On – The user will receive new alerts of file and packages (if the folder permission of the group they’re in has the ‘Notify’ flag on)
On+Admin - will cause the user to receive administrative notifications when other users expire or are locked out, or other such events, but only if the user is a GroupAdmin.
<Add User> - Adds the user to the group, MFT Command Central will let you know if the addition succeeded or not. If not, will provide a reason why.

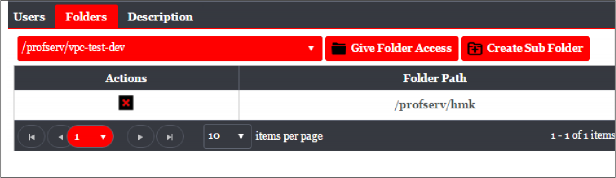
The Folders tab for the group is where you can provide access to which folders your group have access to
Folder Selection Combobox – You can select the folder you wish to provide access or create a sub folder for here. If you have many folders you can also search for the folder here
Give Folder Access – This will provide folder access to the folder selection in the left combo box Create Sub Folder – This will create a new sub folder in the folder you’ve selected in the Folder Selection combobox. A new dialog will show asking for the name of your sub folder.
Actions- There is currently only one button located here which will remove access to the folder path the group already has access to (in the Folder Path column)
Folder Path – These are the folder path(s) this group already has access to.
NOTE: When adding folders to a group in MFT Command Central, by default the group receives these permissions flags on the folder: Read, Write, Delete, List, Subs and Admin. The Notify flag is left off due to avoid receiving unwanted alerts. You can turn it on later through the MoveIT interface.

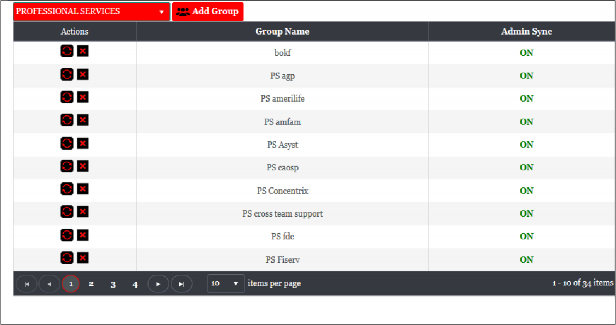
“Associations” is specific feature within MFT Command Central and not feature within MoveIT itself. A ‘Association’ is way to place groups under the same set of administrators in seamless fashion and MFT Command Central manipulates MoveIT to respect the rules of features of MFT’s Association functionality. An Association cannot be created by end-users and must be requested to a MoveIT Administrator. Users however can potentially be part of multiple associations. It is not a one to one relationship.
The Association Grid contains this information:
Actions- This where you can remove groups or turn on or off Action Sync.
Group Name – This is the Groups part of the ‘Association’
Admin Sync – This specifies where the group has Admin Sync functionality running for the association
The Association Controls above is where you can select a “Association” – for most users it will only have one choice. The Add Group button can add an existing group to an Association.
Adding Groups to a Association
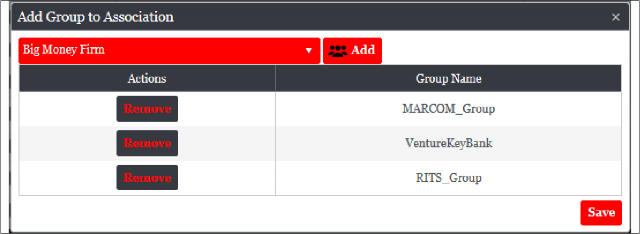
When clicking the “Add Group” button you will receive a new dialog providing a selection of groups to add. The selection of groups is dictated by matching ALL of these rules:
You are a group administrator of the group
The Group is NOT already part of another Association
Interface:
Add – The Add button will add the presently selected group in the combobox to the queue of groups to be added to the association
Actions – The Actions column provides only one option to remove the group from the queue of groups to be added to the association. If you added a group by mistake to the queue you can remove the group here.
Group Name- These are the groups you are adding to the Association
Save – Clicking this button will add the groups in the queue to the Association.
Admin Sync
Admin Sync is the powerful feature with Associations which allows a specific set of group administrators to manage multiple ‘client’ groups in MoveIT. Anyone in the Association’s master group will be Group Administrators in any group that is part of the Association. For example let’s say ‘Group A’ is the master group of the association. Group B and Group C are child groups part of the ‘Association’. All of ‘Group A’ members either Group Admin or not in this group will be added automatically to Group B and Group C as Group Administrators. This helps all administrators in the Association to manage all child groups seamlessly. If you remove someone from ‘Group A’ then it will be retroactive on all child groups as well.
So if ‘Bill’ was part of Group A and is removed then in Group B and Group C ‘Bill’ will be removed from those groups as well if he was a Group Administrator in those groups.
You can identify your master group by going to the ‘Details’ tab and under the Association section find your Primary Group – this is your ‘master’ group.
Staple Admin
Staple Admin is an extension to the Admin Sync functionality which overrides Admin Sync’s removal of a group administrator if that user is NOT part of the master group. So for example if Group A is the master group and Group A doesn’t have ‘Bill’ but child groups Group B and Group C had ‘Bill’ as Group Administrator then with Admin Sync ON Bill would be removed those groups. If ‘Staple Admin’ is marked on ‘Bill’ in Group B and Group C then that would OVERRIDE Admin Sync and keep him as a Group Administrator in Group B and C despite the fact not being part of the master group Group A.
This can be useful is if you wish to have a particular member you wish to be a local group administrator of a group without having all the association privileges. This works well for client administrators for example.
<<<<<<<<<<<<<<<<<<<<< ADMIN SYNC WARNING >>>>>>>>>>>>>>>>>>>>>>
As mention earlier, Admin Sync is a powerful feature and adding the wrong users to your master group could have major consequences to your department if you do not take vigilance on who is in your master group. Adding the wrong person to your master group such as adding a client account for example will effectively make that client account a group admin in every single child group of your association and having access to all folders\files and permissions to everything the association owns.
Client accounts should NEVER be in the master group under any circumstances.
<<<<<<<<<<<<<<<<<<<<< ADMIN SYNC WARNING >>>>>>>>>>>>>>>>>>>>>>
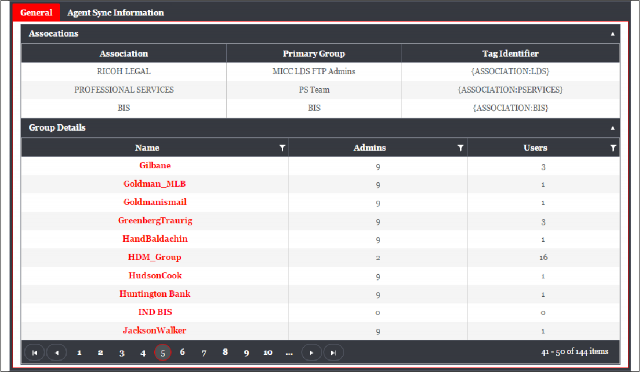
The Details tab provides a general rundown of the Associations you are part of and the Groups you are able to manage.
Associations:
Association – The name of the Association you’re part of
Primary Group – This is considered the ‘master group’ of the Association and the members in this group will be Group Administrators for any child group for the Association with Admin Sync.
Tag Identifier – This is deprecated and no longer has any purpose. Use to be in group description to help identify the association the group was part of but this is no longer tracked within the application.
Group Details:
Name – The name of the group.
Admins – Number of Group Administrators inside the group
Users – Number of members inside the group
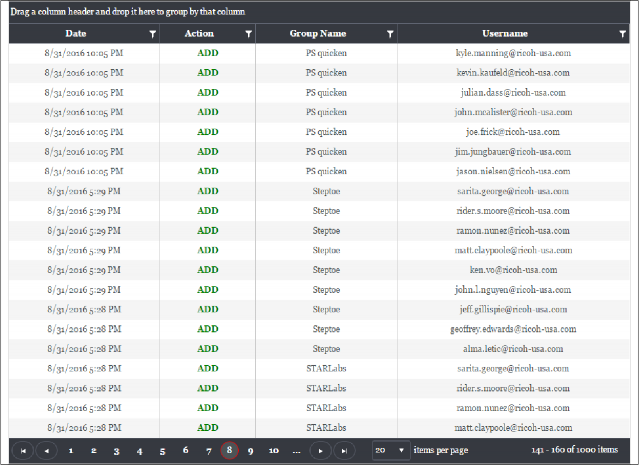
Admin Sync Information Tab under Details provides detailed overview on how the Agent is performing in keeping your Association Administrators in sync between all your client groups.
Date – This is the date of the action performed
Action – This is the action performed for the user. ADD means the user was added to the particular group. REMOVE means the user was removed from the group. Remember these actions are entirely based on who is in the master group of the association and who are the Group Administrators in the client group.
Group Name – The Group the action was performed in. This would generally be a client group in an association.
Username – The user the action was performed for.